As we age, our flexibility and ability to move can become more limited and painful. Our joints become stiffer, muscles weaker, and ligaments shorter, resulting in difficulty doing even simple daily tasks. Fortunately, mobility exercises can prevent this decline, and it’s never too late to start.
Stretching, exercising, and maintaining a healthy diet and weight at a young age will keep your bones, joints, and muscles stronger later in life.
But if you’ve missed that window, you can still strengthen your joints and decrease your pain. It doesn’t even take special equipment or an expensive gym membership. You can start mobility exercises where you are now, no matter your age or strength level.
Why Aging Leads to Pain
One of the most common problems we treat is joint pain in our older patients. Many believe that it’s inevitable that age causes pain. To a certain extent, this can be true.
Your joints contain cartilage, synovial membranes, and synovial fluid. As you age, the cartilage becomes thinner, and your body produces less synovial fluid. This results in stiffness and pain. On top of that, your muscle fibers shrink, and bones lose their density.
All these things make it harder for your body to do the things that used to be effortless.
However, these changes aren’t solely due to age. Researchers are increasingly uncovering how a sedentary lifestyle leads to pain and stiffness at an earlier-than-average age.
While stiff joints are somewhat expected and difficult to prevent for someone in their 80s, they’re typically preventable or reversible for someone in their 40s, 50s, and even 60s. Combined with a nutritious, balanced diet, mobility exercises will help you live a longer, pain-free life. They can even prevent osteoarthritis and osteoporosis.
Gentle Mobility Exercises
Some people worry that, due to their age, health condition(s), or pain level, they won’t be able to perform the movements necessary to strengthen their muscles and joints.
However, you can modify most mobility exercises to accommodate any issue you are dealing with. You can work up to more challenging moves and posture as you build strength. Or, if you have permanent disabilities, you can maintain modified exercises to gain strength and functional mobility where possible.
Most importantly, listen to your body. These movements shouldn’t cause significant discomfort, even if you are unused to exercising. As you start building these exercises into your daily routine, don’t push yourself or your joints beyond the limits of what you can comfortably do. Otherwise, you may cause more injuries than you are preventing.
The other major factor that prevents people from exercising and moving more is time. Most of us feel like there aren’t enough hours in the day.
Fortunately, this entire routine shouldn’t take more than 15-20 minutes. With the right moves and, if possible, an additional 15-30 minutes of gentle aerobics (such as walking or swimming), improving your mobility and health shouldn’t take much time out of your day.
Lower Body Mobility Exercises
When you start doing mobility exercises, it’s easiest to remember them all by starting from your feet and working your way up.
Lower body mobility exercises strengthen and loosen the joints of your ankles, knees, and hips. Stronger joints provide better balance and stability while decreasing pain and the risk of injury.
Ankle Rotations
Whether standing or sitting, start by rotating your ankles. Keep the ball of your foot on the floor as you
turn your ankle one way for 10-20 cycles, reverse circles, and then switch to your other leg.
If you can, raise your leg off the floor as you rotate your foot to increase your balance and stability. Hold a wall or chair until you’re strong enough to balance without support.
Knee Rotations
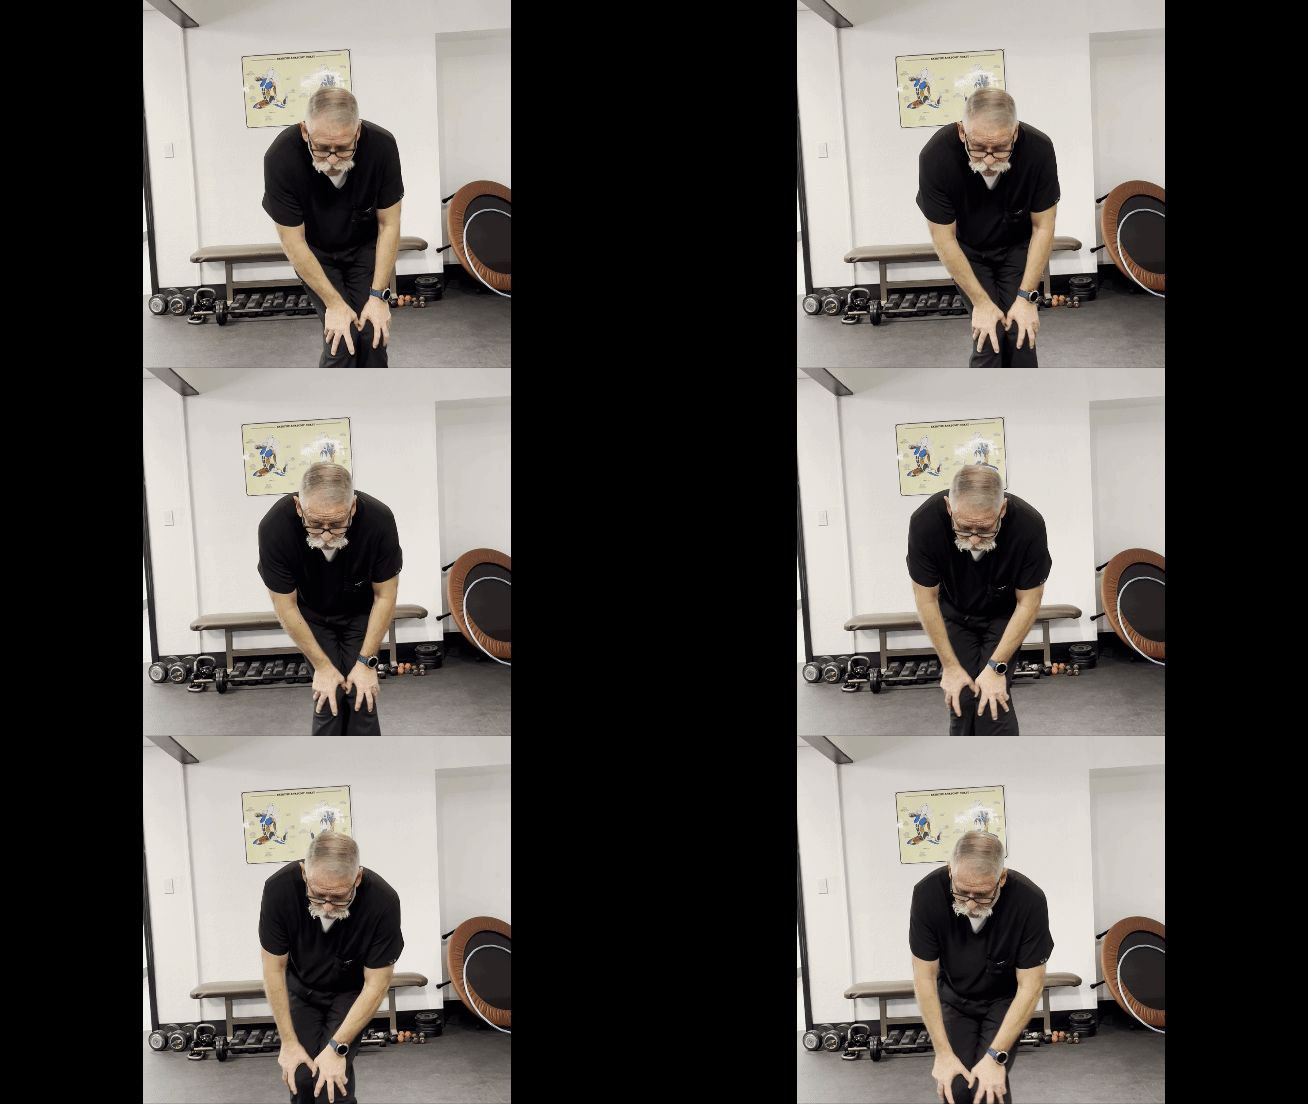 Stand with your feet together, and begin by slightly bending your knees. Slowly move both knees in gentle circles, supporting your balance with a wall or chair if needed. Remember to rotate in both directions.
If you cannot stand, sit on the edge of a chair and rotate each knee individually as best as possible. When doing these motions in a seated position, the higher the chair is from the ground, the better. It allows you more room to move.
And don’t worry if you hear popping or creaking! The sound of joints popping and crackling, known as crepitus, is normal for people of any age. In most cases, it’s the completely harmless sound of gas bubbles in the synovial fluid bursting or ligaments snapping into place. However, pain combined with these sounds may indicate osteoarthritis, which you should discuss with your doctor.
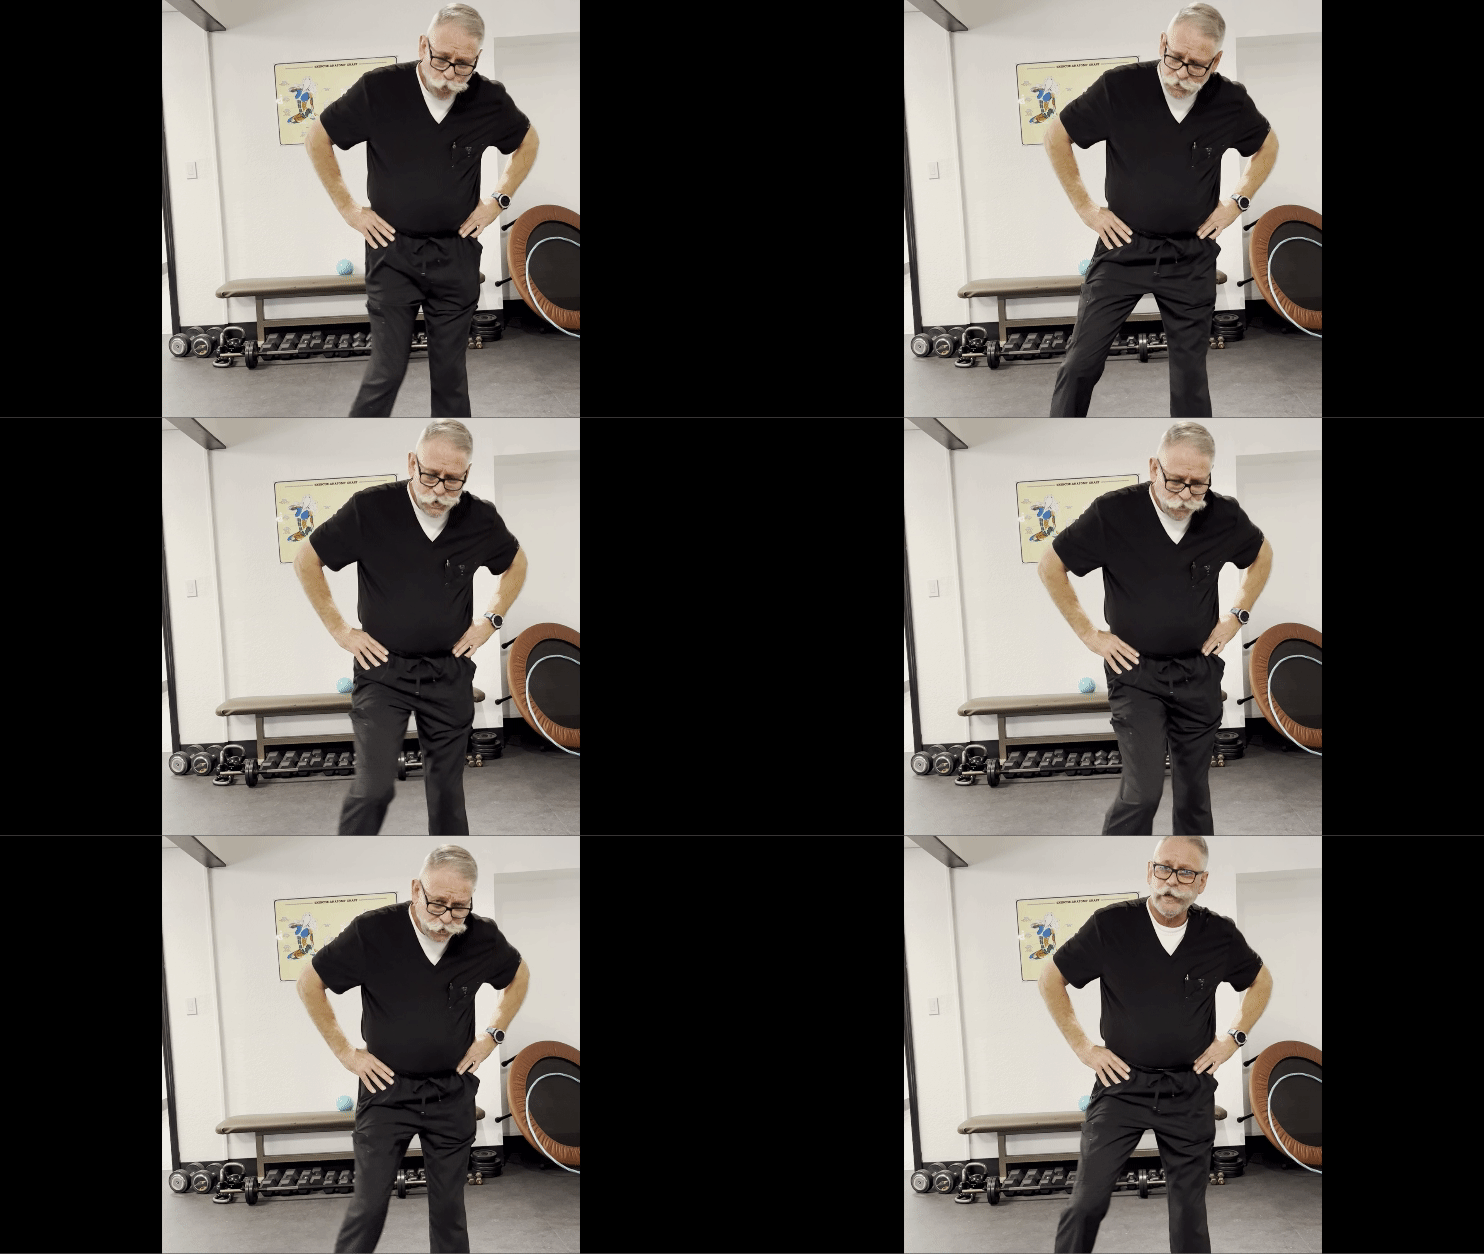
Hip Rotations
Finally, stand with your feet about hip-width apart and move your hips in circles. Then, do the same number of rotations in the other direction.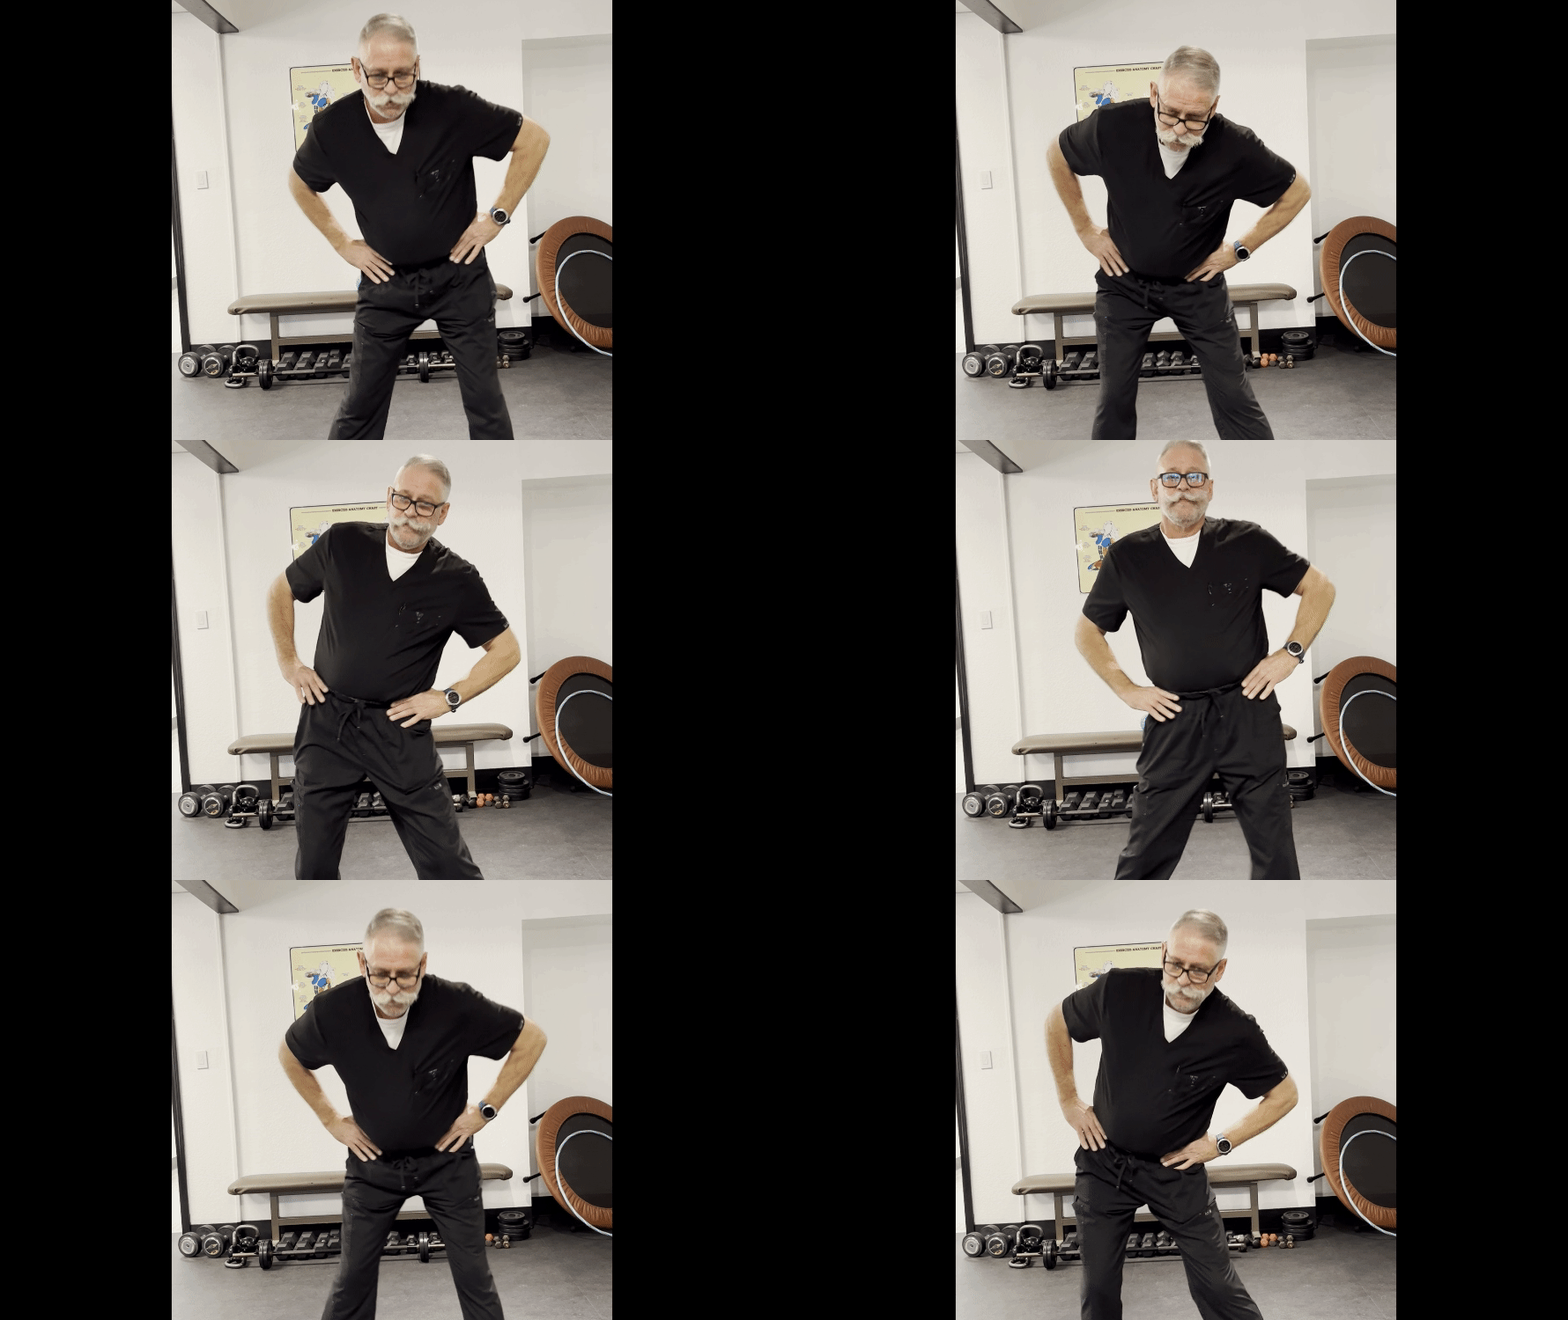
Unfortunately, hip rotations are challenging to perform sitting down. If you struggle with balance or weakness but can safely stand, practice these moves directly in front of a chair or bed and use a walker, another chair, or a wall to support yourself.
These rotations loosen the ball joints of your hips and are excellent for lower back flexibility and pain reduction. Therefore, if standing isn’t possible, you can do seated twists to at least build strength and flexibility in your lower back.
Upper Body Mobility Exercises
Most people will experience back, neck, and shoulder pain at some point. It can occur due to past injuries and trauma, poor posture, or lack of exercise. Regardless of why it develops, discomfort in these areas can make it hard and even impossible to perform daily activities.
Even if you cannot stand, performing upper body mobility exercises can help you maintain or regain strength in these areas.
Shoulder Shrugs
It’s crucial to take care of your shoulders. Not only do they support so much of what we do, but they are also one of the most commonly injured parts of the body.
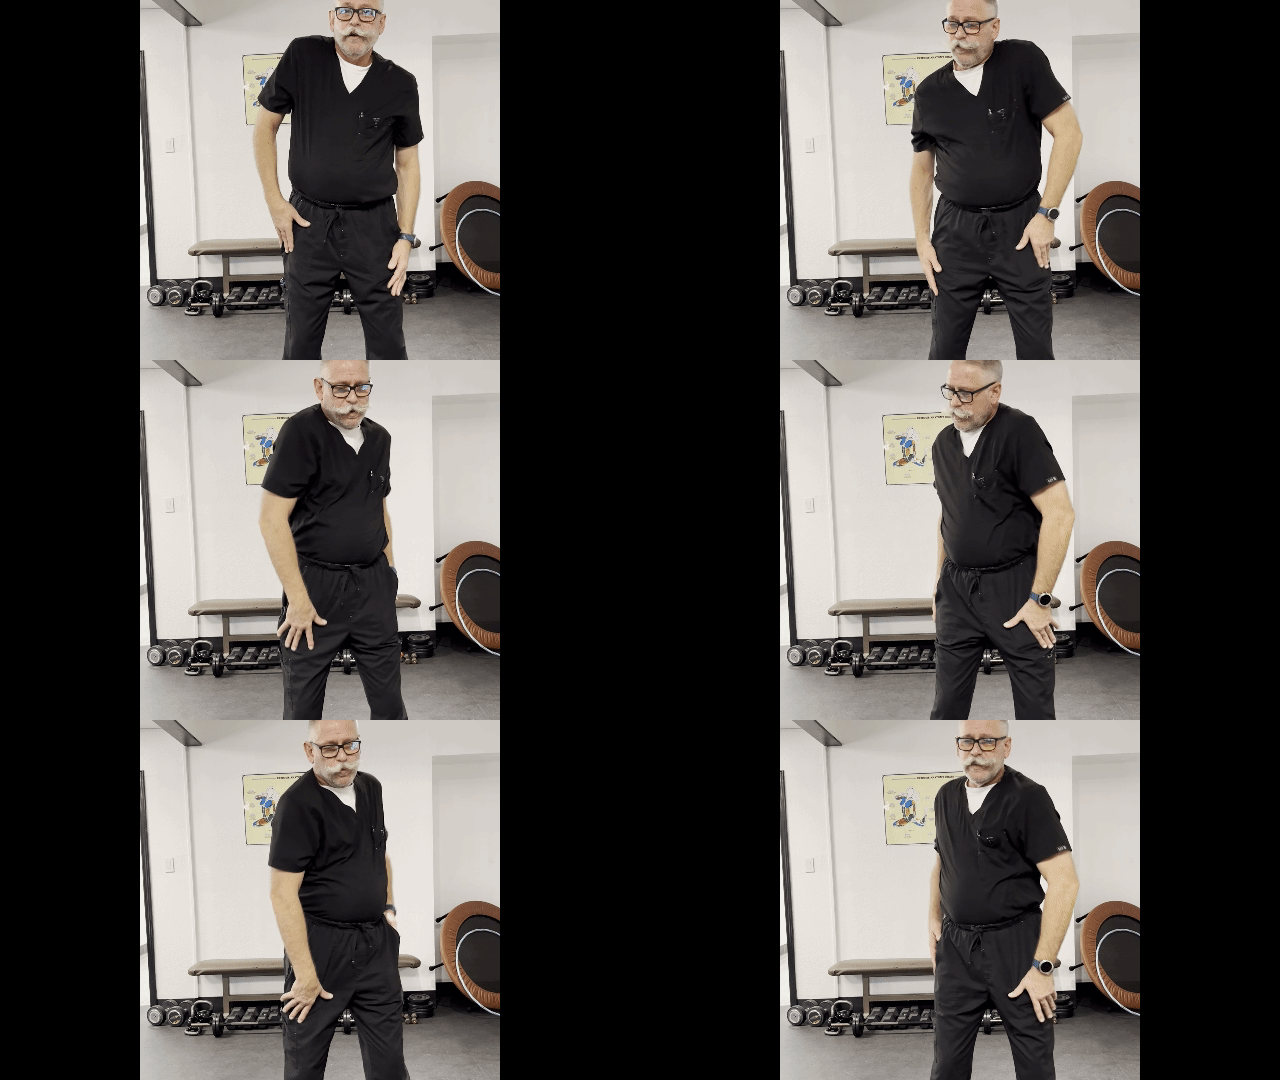
There are actually four different joints in your shoulder, all supported by the clavicle and scapula. However, the glenohumeral joint is the ball-and-socket joint that connects our upper arm bone (the humerus) to the shoulder. This is the most freely movable joint in the body, which gives us the range of movement we need but also makes it the most vulnerable.
To perform shoulder shrugs, move each shoulder in full circles while keeping your arms at your sides. You can move them simultaneously or separately; it’s your choice. After your set number of rotations, reverse the circles.
Elbow Rotations
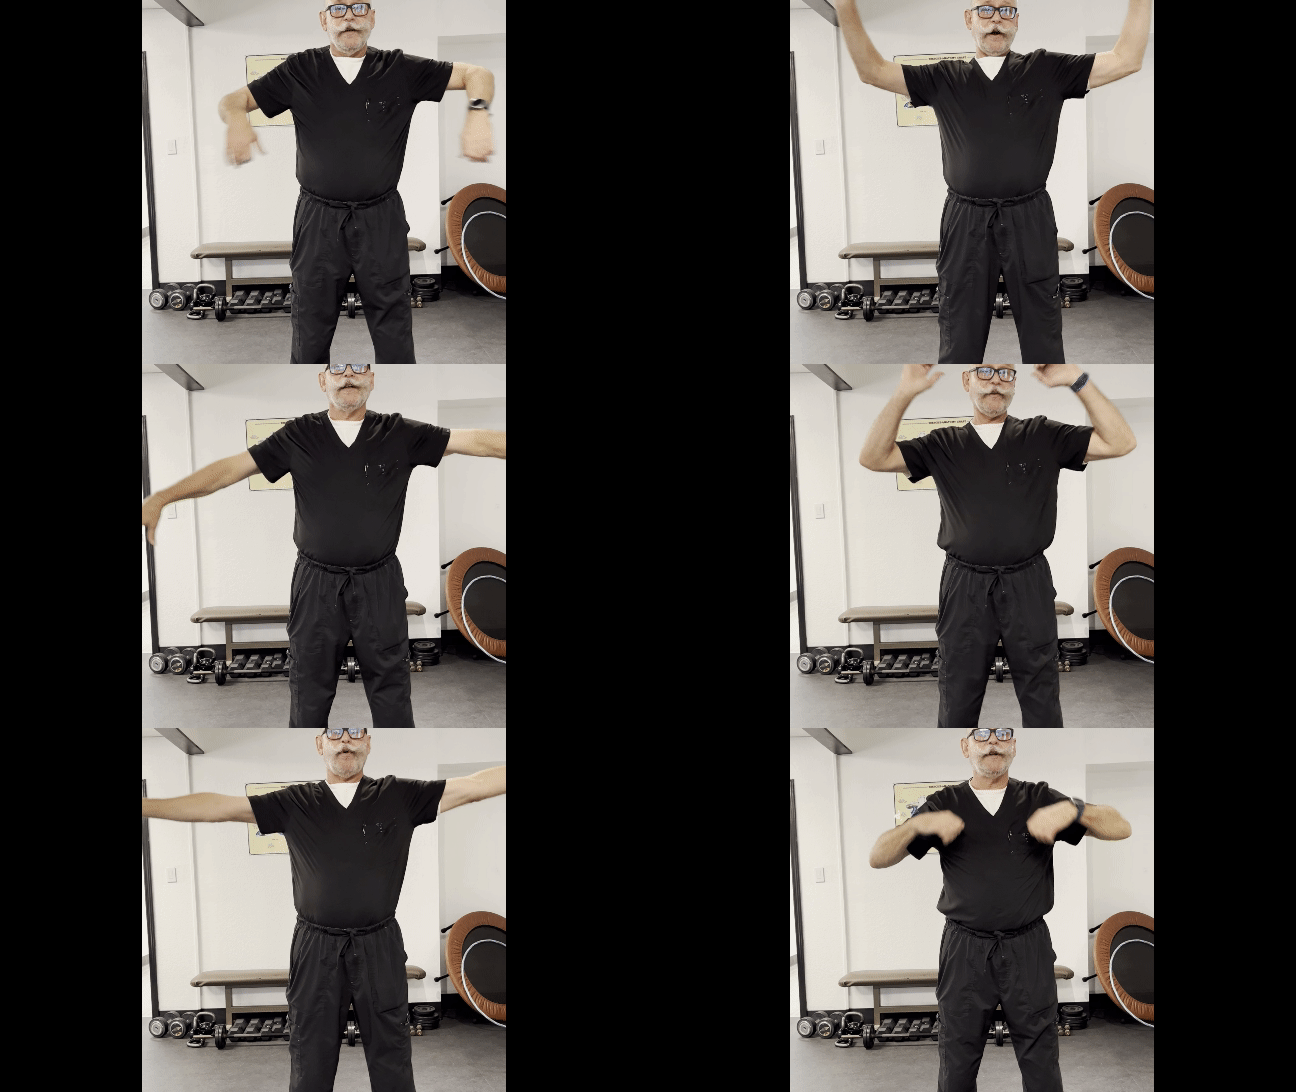
Hold your arms out on each side, like a T, and make circles with your forearms one way and reverse.
This is another move that can cause popping and creaking from the elbows to the shoulders. Just remember, it’s normal. However, if your movement is extremely limited or the popping causes significant pain, consult your doctor or chiropractor.
Wrist Rotations
Keeping your arms out straight on each side, move your hand in circles to loosen and stretch the joints in your wrists. After 15-20 rotations, reverse.
If your arms are beginning to tire from holding them up, you can lower them for this exercise. Over time, you’ll build enough strength to keep them up throughout the moves.
Wrist Flexion and Extension Stretches
Flexion: Holding both arms straight in front of you, open the palm of one hand to face the ceiling and point your fingers down toward the floor. Hold your pointing fingers with your other hand and apply gentle pressure for 15-30 seconds. Switch arms.
Extension: Open your hand with your palm facing the floor and fingers pointing down. Again, use your other hand to increase the stretch and hold for 15-30 seconds. Switch.
Behind the Back Reach
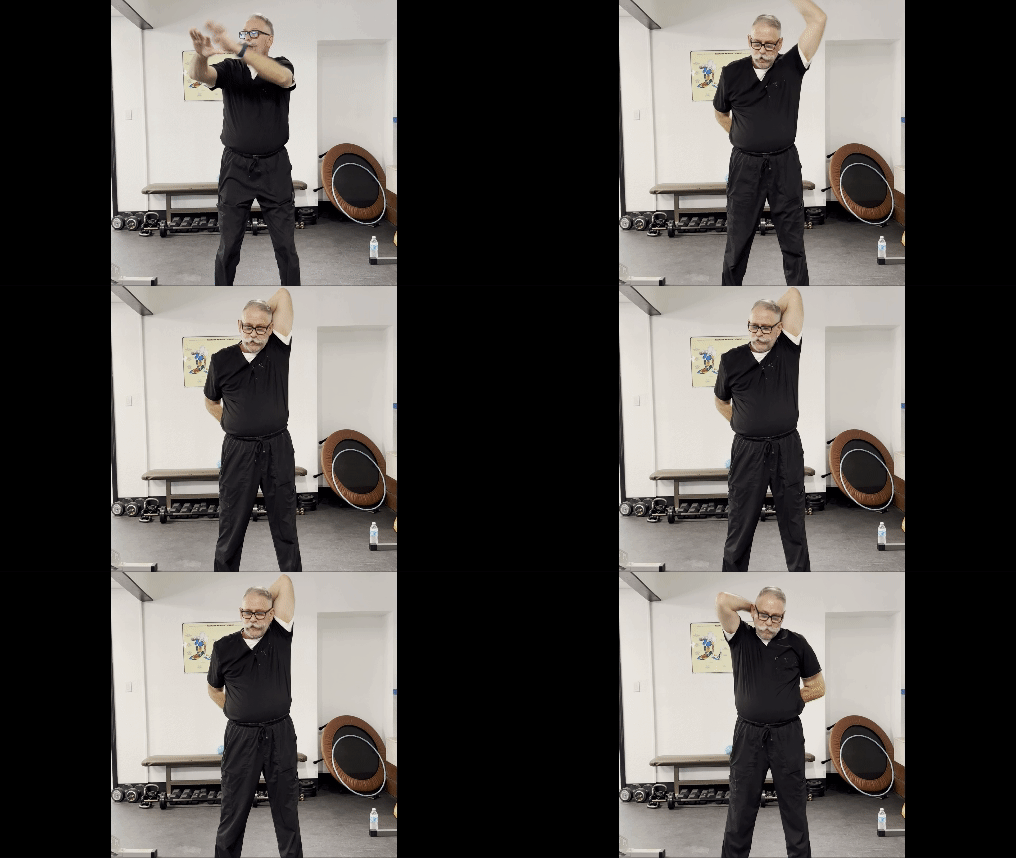 Reach one arm up and one arm down behind your back. Clasp your hands and hold for 15-30 seconds before switching. If you cannot touch your hands, simply hold your arms in place.
This is a challenging stretch, so don’t feel let down if your hands can’t reach each other. These mobility exercises will increase your flexibility more and more with daily practice.
Neck Rotations
Start by tucking your chin slightly. Then, rotate your head to the right, up, left, and back down. Pretend you are drawing circles in the air with your nose. After 5-10 rotations, reverse the circle.
And don’t forget to breathe! Try breathing in as you raise your head and out as you lower it. Not only does this help you breathe more deeply, it also slows down your movement, ensuring you’re making the most of the stretches.
Because this exercise can cause dizziness for some, feel free to sit down for neck rotations if needed. You can also get a good neck stretch by tilting your head one side at a time, ear to shoulder, and applying gentle pressure with your hand. Keep your shoulders down (no shrugging!), and don’t push or crank your neck.
Whole Body Mobility Exercises
The following exercises may be more challenging if you are unstable or incapable of standing unsupported.
However, that doesn’t mean you shouldn’t try these to the best of your ability. Even when modified, being able to strengthen multiple muscles at the same time helps you decrease pain and increase your ability to accomplish daily tasks.
Bending Arm Sweeps
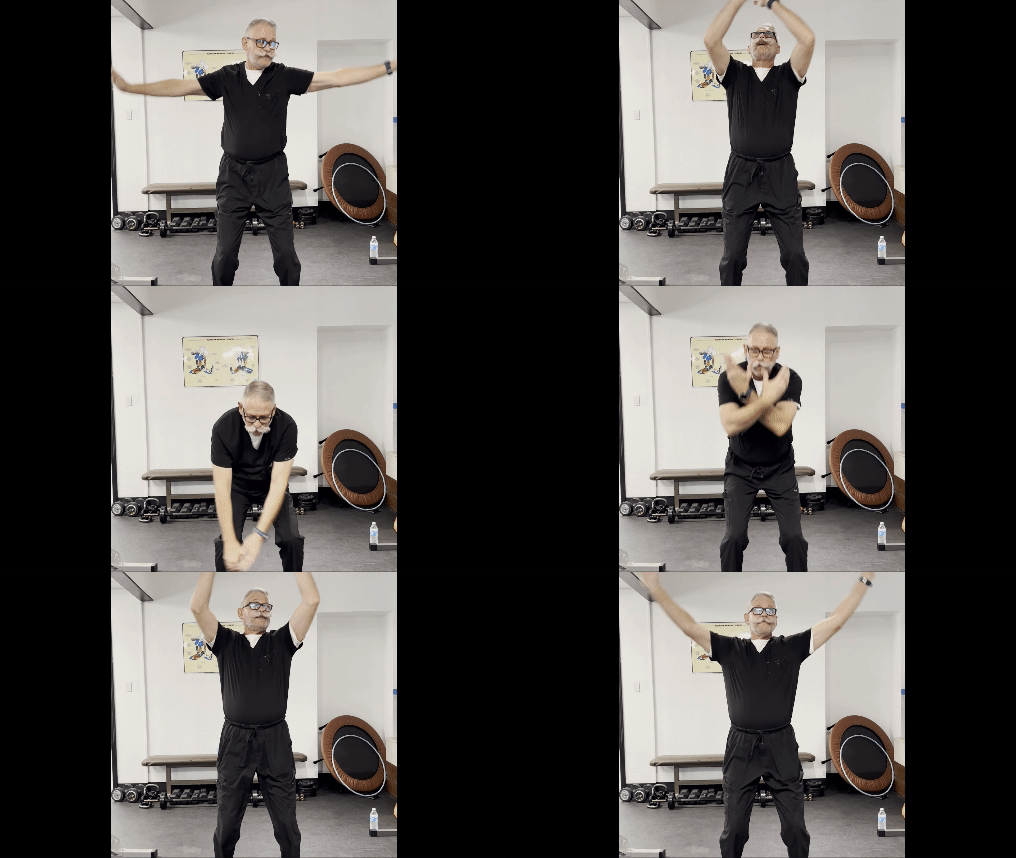
From a standing position, sweep your arms down while slightly bending your knees. Continue sweeping your arms back up in a circular motion as you return to standing. After 5-10 repetitions, reverse your arm circles.
This exercise strengthens and stretches your ankles, knees, lower and upper back, core, and shoulders.
Standing Twists
This exercise might initially feel silly, but it’s fantastic for decreasing back pain, improving digestion, and lessening stress.
Stand with your feet hip-width apart, and begin twisting your upper torso from your hips. Keep your arms loose and let them swing back and forth as you turn left and right.
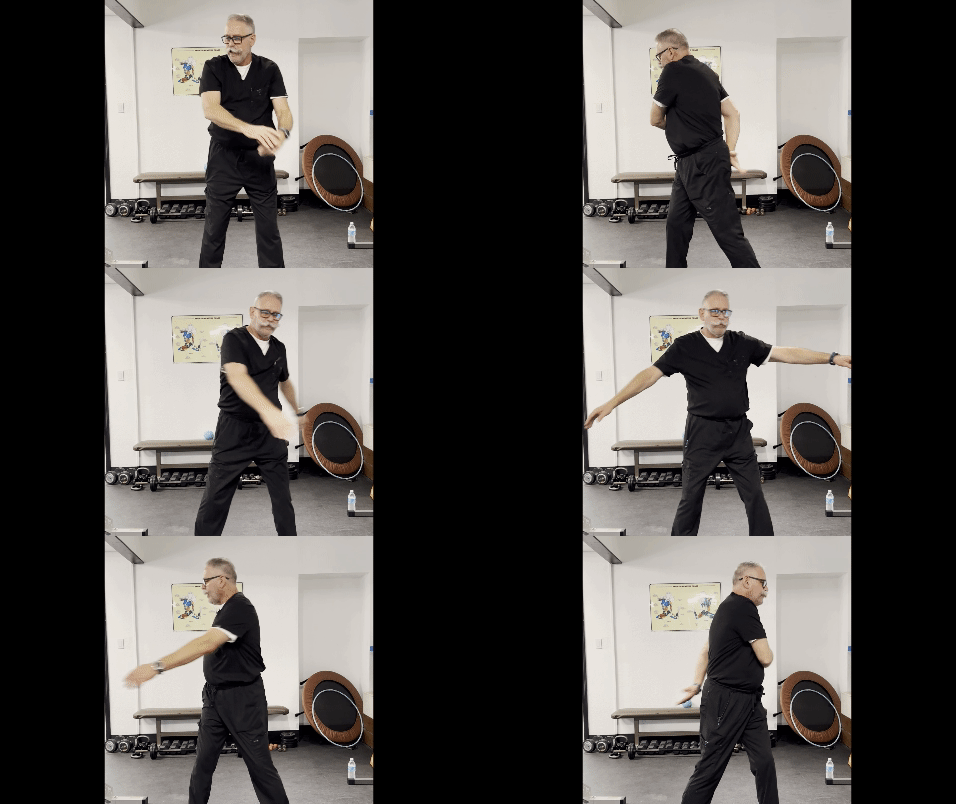 For an added bonus, lean into the side you’re facing as you twist to each side and rotate the opposite foot.
Don’t push yourself; let the natural rhythm of your arms aid your twists. Have fun with it, turn on some music, and make it into a dance. And again, if you have stability issues, keep a chair behind you to catch you if you fall.
These twists loosen the vertebrae of your lower and middle back, increase flexibility in your shoulders, and strengthen your core, knees, and ankles.
Reach and Bend
Begin by standing with your feet hip-width apart and arms at your sides.
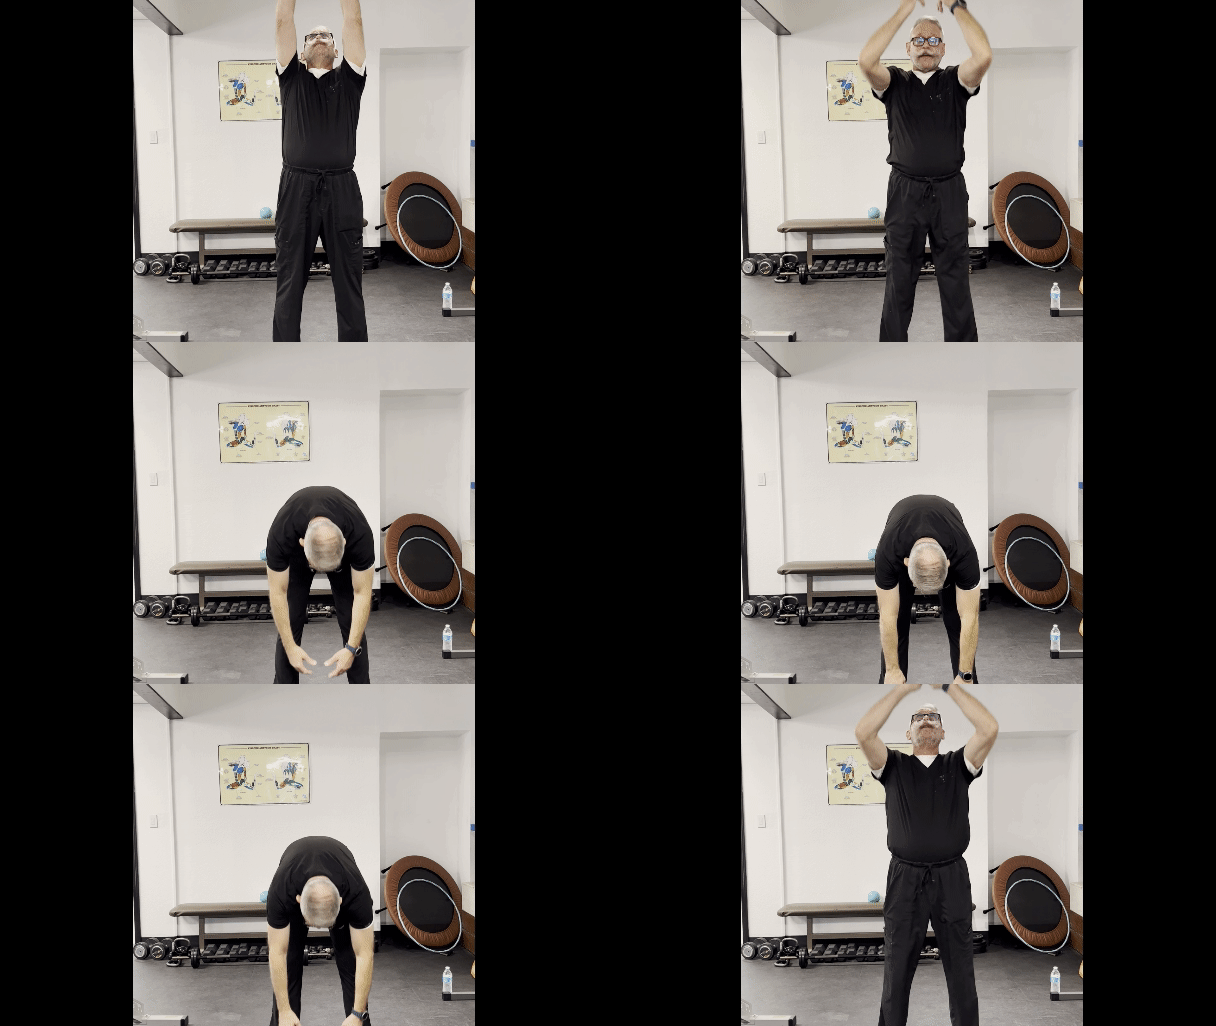 Slightly bend your knees as you sweep your arms up above your head. Hold for a breath or two, and then slowly lower your arms all the way down as you bend at the waist. Hold for another couple of breaths and repeat 3-5 times.
Don’t fret if you can’t touch your toes. Front bends are perfect for stretching your spine regardless of how low you can go.
To deepen the stretch and improve articulation in your spine, roll up slowly like a ragdoll as you rise from the bend as if you are standing up one vertebra.
Cat-Cow
If you’re unfamiliar with this series of yoga poses, the name might sound odd, and you may feel a little silly doing it at first. However, like the floppy arm twist, it is as beneficial for your back as it feels.
Start on your hands and knees, shoulder-width and hip-width apart.
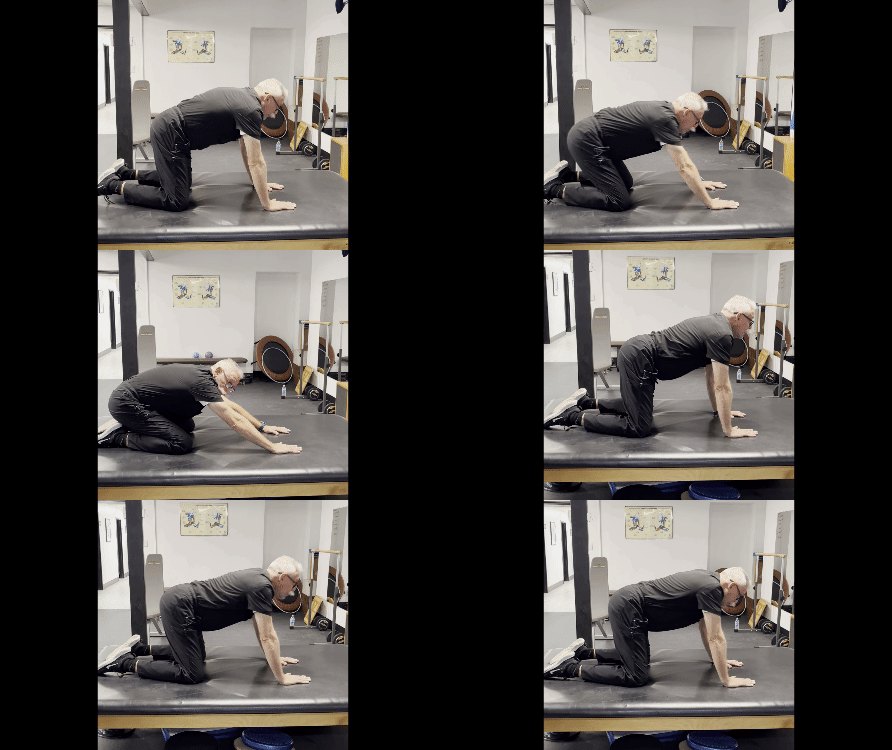
Cow: Inhale as you drop your belly, tilt your pelvis up, and lift your head.
Cat: Exhale while arching your back, bringing your belly button toward your spine. Lightly press into the tops of your feet, round your shoulders, and lower your head.
Move with your breath as you repeat ten times.
For an added stretch, from Cow, push back into your hips and knees while lowering your chest to the floor and keeping your hands where they were. Breathe, then move into Cat and repeat. This bonus move stretches the upper back, shoulders, and chest and strengthens your hips and knees.
You can modify this exercise from a sitting position by putting your hands on your knees and performing the same movements.
Floor Stretches
These floor exercises stretch the joints and muscles of your whole body.
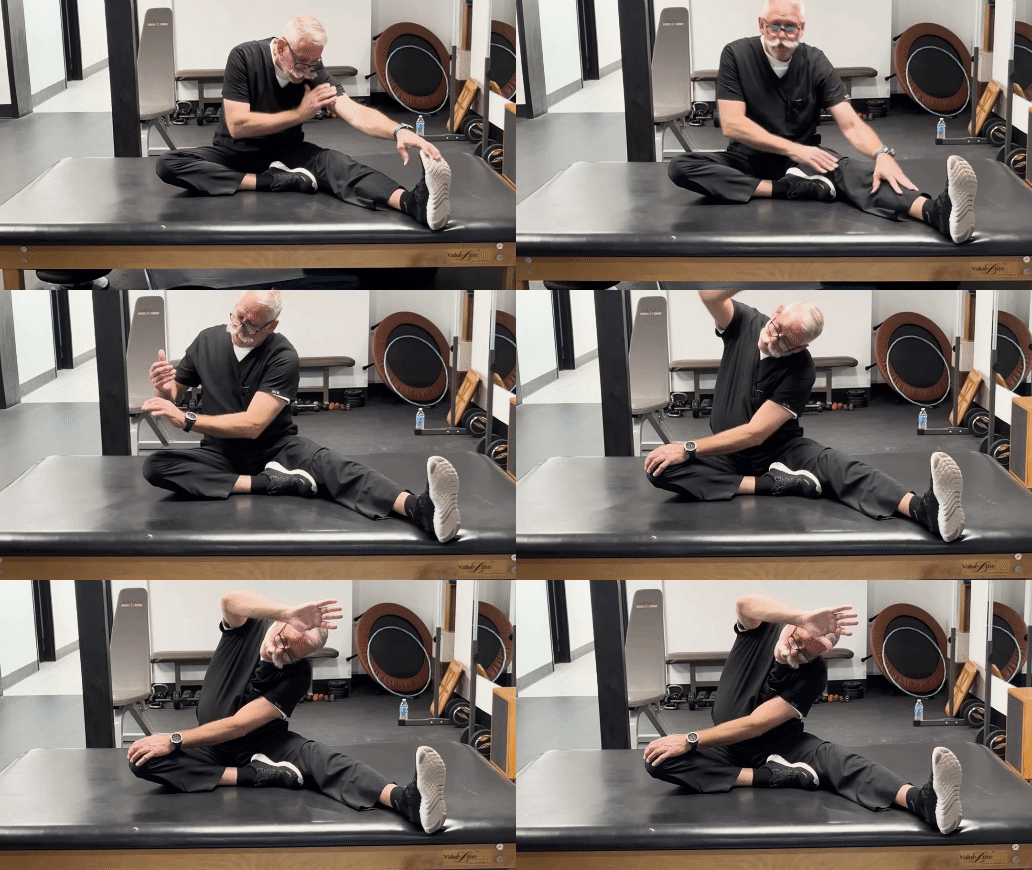
- First, we do what is known as the hurdler’s stretch. Straighten one leg out to the side with the other bent. Touch your toes, ankle, or shin and hold.
- Then, sit up and place your opposite hand on your bent knee. Raise your other arm and lean toward your straight leg for a side-body stretch. Switch legs and repeat.
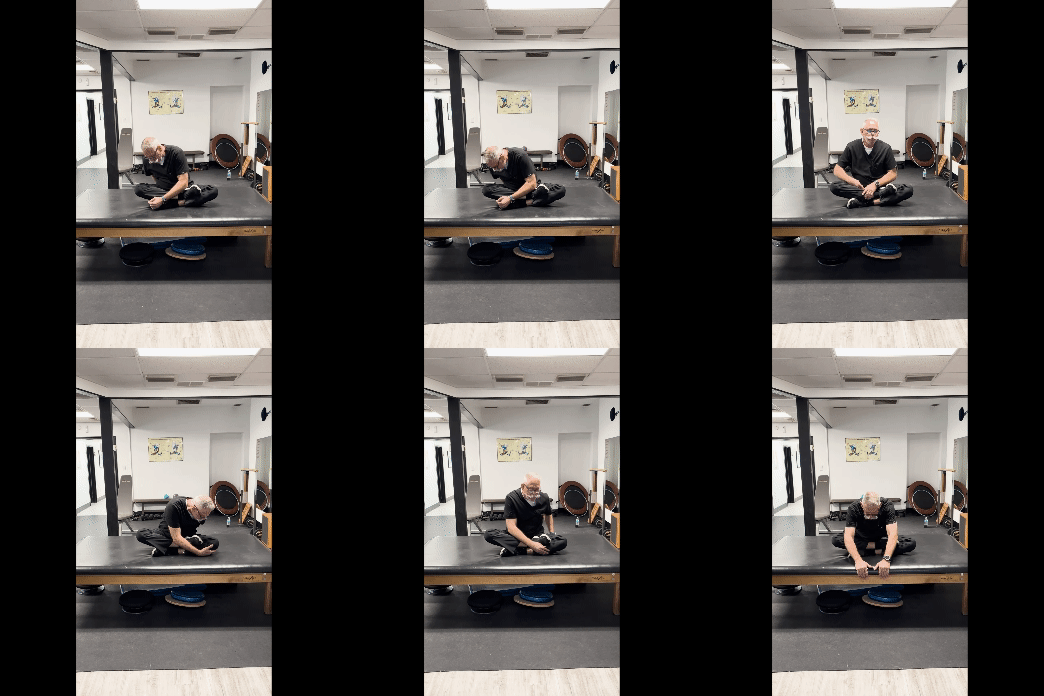
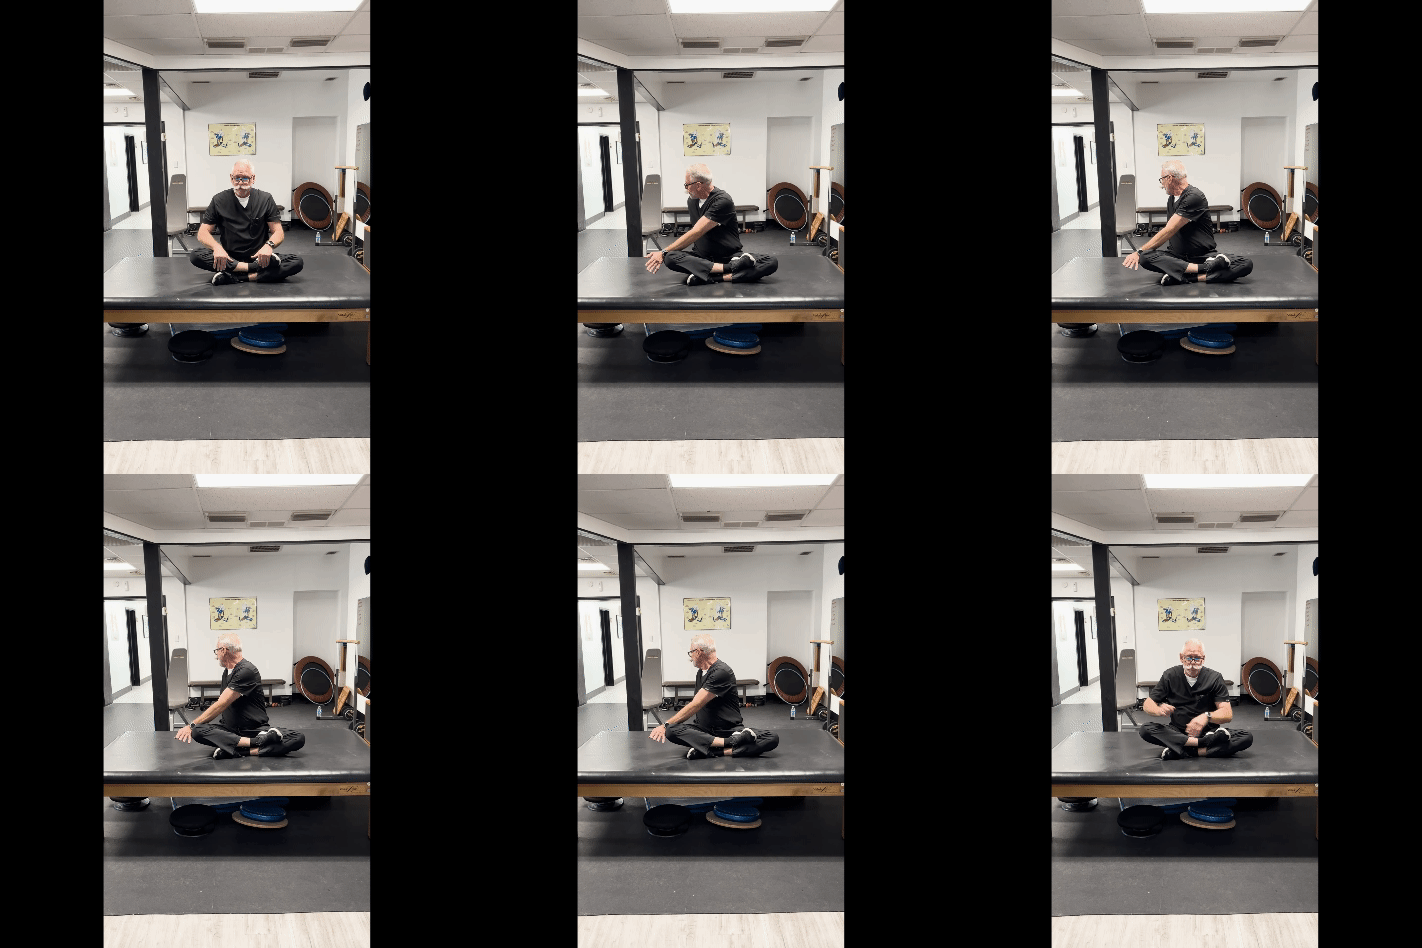
- Next, sit with your legs crossed with the right foot on top. Stretch to your left, right, and then front, holding each for a breath or two.
- From the same position, place your left hand behind your right knee and twist to the right. Hold. Switch your leg placement and repeat 3 and 4.
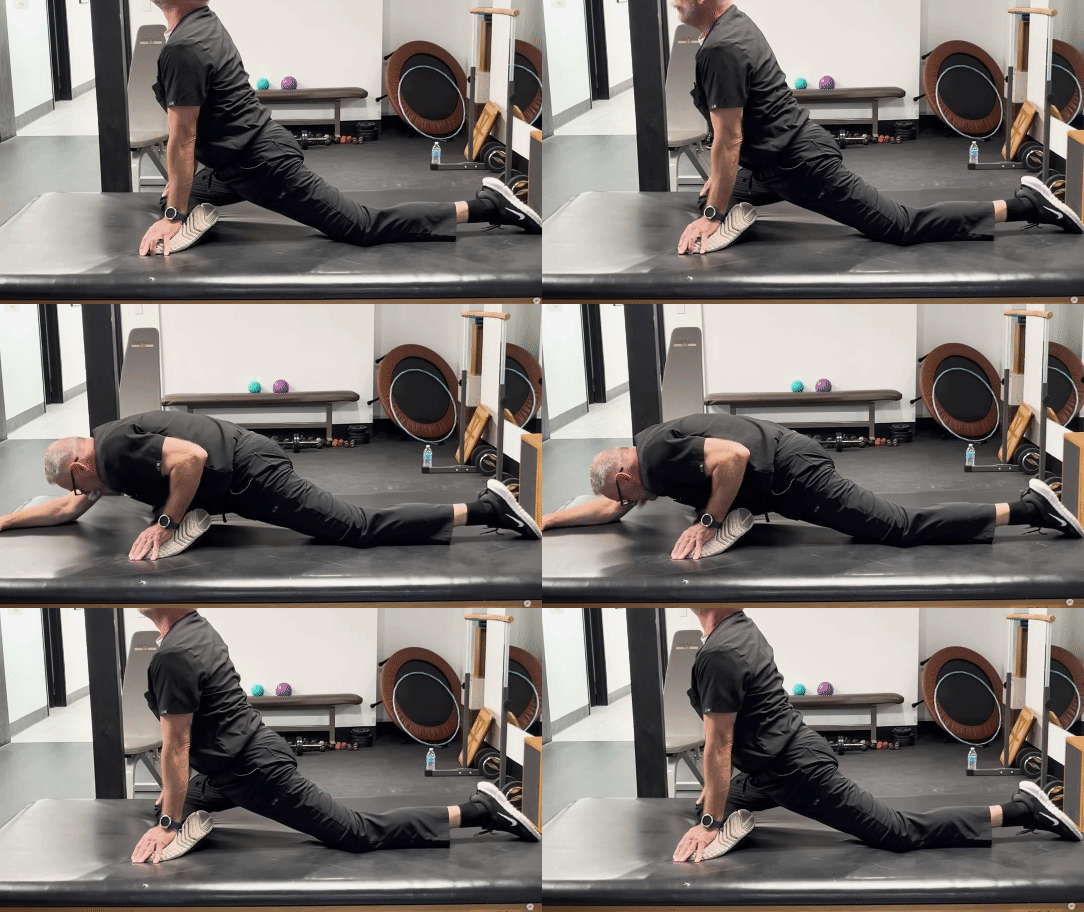
- Afterward, move into a lunge position with your right leg straight behind you and your left leg bent in front. Place both hands on the floor for a deep lunge, or support your back with hands on your bent knee. Just be sure to keep your knee behind your big toe. Switch sides.
- From your lunge, twist your front leg in front of you so that your calf is perpendicular to your body. Keep your back leg straight. Look up as you arch your back and hold. Then, with care, gently lower your body over your bent leg for a deep hip stretch. In yoga, this is called pigeon pose.
- Finish your floor stretches by returning to a seated position and bringing your feet together and knees apart for a cobbler’s pose. Holding your feet, lean forward and hold for a few breaths. Even if you can’t bend forward much, this pose provides a deep stretch in your inner thighs, hips, knees, and lower back.
It’s Never Too Late
No matter how inflexible you feel or how much pain you’re experiencing, beginning daily stretches and mobility exercises can help you regain easier movement.
In addition to these exercises, other ways of improving your health and mobility include walking, swimming, dancing, light strength training, yoga, and tai chi. Even household activities, like gardening and cleaning, help you maintain your joints and muscles.
Remember to go easy on yourself and start small. Pushing your body beyond its limits only causes more pain and can lead to injuries.
Before beginning any exercise or stretching routine, it’s best to consult your healthcare provider or chiropractor. This is especially important if you struggle with stability, are recovering from an injury or trauma, or are of an advanced age or weakened state.
They can make recommendations to help you rehabilitate your joints and muscles safely.
Regardless of how much you can and can’t do today, building mobility exercises into your daily routine will help you be healthier and more mobile tomorrow.
(All exercise demonstrations in this post were performed by Dr. Al Daniel.)
